Monday, January 31, 2011

How to change your Blogger Logo?

Stumble ThisFav This With TechnoratiAdd To Del.icio.usDigg ThisAdd To RedditAdd To FacebookAdd To Yahoo

After your logo is ready for display, you have to upload it to some site. You may use ImageShack for uploading the picture. After you upload the picture, you will get a link to that picture. Copy that link and save it in a text file.


1. Now, go to your blogger dashboard. Navigate to "Layout>>Edit HTML". Make sure you back up your template before doing any changes.
2. Search for the following code using "CTRL+F"


</head>

3. Now, paste the following code above the line mentioned in step 2.

<link href='http://img502.imageshack.us/img502/3879/micon.gif' rel='shortcut icon'/>

<link href='http://img502.imageshack.us/img502/3879/micon.gif' rel='icon'/>

4. You may replace the above link marked in blue with the link. to your image. Save your template and have a look at your blog (address bar) now.
Stumble ThisFav This With TechnoratiAdd To Del.icio.usDigg ThisAdd To RedditAdd To FacebookAdd To Yahoo

There are many sites that provide widgets to display the "Related Posts" at the end of every page. Just follow these steps:
1. Navigate to "Layout>>Edit HTML" from your dashboard. Make a back up of your template before you do any changes in the template.
2. Now, expand your template, that is, make sure that you have a tick mark in that "Expand Widget Template". Now, do a search using "CTRL+F" for the following line:

 
<data:post.body/>


3. Download this text file. Open the text file and insert the following piece of code just after the above line.
4. Now, Save your template. Preview each of your posts separately. If you have any problem in downloading the file or with the code, then please leave a comment.

Stumble ThisFav This With TechnoratiAdd To Del.icio.usDigg ThisAdd To RedditAdd To FacebookAdd To Yahoo

The best way to stop people copying images is to disable the right-click option in your blogger page. You can do this simply by following these simple steps:
1. Go to "Layout->Edit HTML" from your dashboard. Always, you should make a backup of your template before modifying the HTML by clicking on the "Download full template" link at the top of the page first.
2. Search for the following code in your template.

 
<body>


3.Replace the above code with the following code.
 
<body onmousedown="return false" oncontextmenu="return false" onselectstart="return false">


or you can use this js code on your blog:

 
<script type="text/javascript">

var omitformtags=["input", "textarea", "select"]

omitformtags=omitformtags.join("|")

function disableselect(e){

if (omitformtags.indexOf(e.target.tagName.toLowerCase())==-1)

return false

}

function reEnable(){

return true

}

if (typeof document.onselectstart!="undefined")

document.onselectstart=new Function ("return false")

else{

document.onmousedown=disableselect

document.onmouseup=reEnable

}

</script>

Stumble ThisFav This With TechnoratiAdd To Del.icio.usDigg ThisAdd To RedditAdd To FacebookAdd To Yahoo

Here's how to add social bookmark buttons at the end of each post:
1. Go to "Layout->Edit HTML (check the "expand widget templates" option is ticked). You should make a backup of your template before modifying the HTML by clicking on the "Download full template" link at the top of the page first.
2. You need to search for the following line in your expanded template.

 
<div class="post-footer-line post-footer-line-1">


3. Paste the following code just after the above line.


<!-- Start of social bookmarks -->

<b><i>Share this:</i>

|<a expr:href='"http://digg.com/submit?phase=2&url=" + data:post.url + "&title=" + data:post.title'

target='_blank'>Digg It</a> |

<a expr:href='"http://technorati.com/faves?add=" + data:post.url' target='_blank'>Add to Technorati</a> |

<a expr:href='"http://del.icio.us/post?url=" + data:post.url + "&title=" + data:post.title'

target='_blank'>Save on Del.icio.us</a> |

<a expr:href='"http://www.stumbleupon.com/submit?url=" + data:post.url + "&title=" + data:post.title'

target='_blank'>Stumble It</a> |

<a expr:href='"http://www.facebook.com/share.php?u=" + data:post.url + "&title=" + data:post.title'

target='_blank'>Share on Facebook</a> |

</b>

<!-- End of social bookmarks -->


4. Preview your blog to make sure the bookmark button appears as you want at the end of the posts. Your final output should be like the one at the end of my post.

Stumble ThisFav This With TechnoratiAdd To Del.icio.usDigg ThisAdd To RedditAdd To FacebookAdd To Yahoo

If you take a look at your existing Blogger title you’ll see that blogger displays the blog name first then followed by your post title. They have it backwards so let’s get your blog setup properly.

Follow these very simple steps and you can optimize your blog.
1. In your Blogger dashboard, go to “Layout” => “Edit HTML”.
2. In the template code, do a search for this:


<title><data:blog.pageTitle/></title>


It’s usually in the first 5-10 lines of code in your template.
3. Replace the above code with the following code:

<b:if cond='data:blog.pageType == "index"'>

<title><data:blog.title/></title>

<b:else/>

<title><data:blog.pageName/> | <data:blog.title/></title>

</b:if>


4. Save your template and go back to your blog.

Stumble ThisFav This With TechnoratiAdd To Del.icio.usDigg ThisAdd To RedditAdd To FacebookAdd To Yahoo

If you just want to show up HTML codes in your blogger post, that is without any customization, then use this site : Simple Code. This method will show the HTML as it is and looks very simple. If you want to customize the way it is displayed, like I do in my blog, then you should follow the next method. In this method, you will have to include some codings and then your job will be done.

Follow these simple steps to include the HTML/Java script codes in your blog post:
1. Navigate to "Layout>>Edit HTML" from your dashboard. Make a back up of your template before you do any changes in the template.

2. Now, do a search using "CTRL+F" for the following line: ]]></b:skin>
(Note: I have used the first method here. Just to show you how it looks)
3. Once you find the code, paste the following piece of code above it:


pre

{

background:#efefef;

border:1px solid #A6B0BF;

font-size:120%;

line-height:100%;

overflow:auto;

padding:10px;

color:#000000 }

pre:hover {

border:1px solid #efefef;

}

code {

font-size:120%;

text-align:left;

margin:0;padding:0;

color: #000000;}

.clear { clear:both;

overflow:hidden;

}


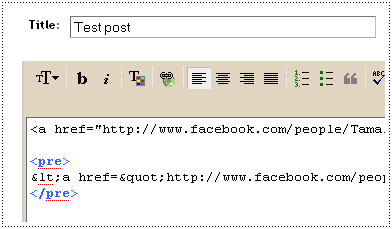
4. Once you do this step, save your template and return to your blog post where you want to insert the HTML code. Place the HTML content in between the following two tags namely, <pre> xhml your code </pre>
5. You can include the code straight away in the "Compose Mode" of your blog post area. After you complete your post, you can simply click the button "PUBLISH POST" and later, view the result.

Stumble ThisFav This With TechnoratiAdd To Del.icio.usDigg ThisAdd To RedditAdd To FacebookAdd To Yahoo

বর্তমান সময়কে বলা হয় বিশ্বায়ন এর যুগ।

আমরা যেমন অন্যভাষার ওয়েবসাইট থেকে বিভিন্ন কিছু জানি তেমনি আমরা যারা প্রবাসে আছি তারাও আমাদের বিদেশি বন্ধুদের কাছে আমাদের দেশের মেধাবী ওয়েব ডিজাইনারদের ওয়েবসাইট তূলে ধরতে পারী।যদি আমদের ওয়েব বা ব্লগগুলোতে অনুবাদক থাকে যা অন্যভাষীদের আমাদের ভাষা বুজতে সাহায্য করবে।

গুগল অনুবাদককে আপনার সাইটে এড করতে নীচের HTML কোডটি কপি করে আপনার সাইটে পেস্ট করুন।


<div id=”google_translate_element”></div><script>

function googleTranslateElementInit() {

  new google.translate.TranslateElement({

    pageLanguage: ‘en’

  }, ‘google_translate_element’);

}

</script><script src=”//translate.google.com/translate_a/element.js?cb=googleTranslateElementInit”></script>


সবাইকে ধন্যবাদ ।